Monday, February 8, 2021

Server - Docker and Hadoop Development Environment.

■ Docker & Kubernetes Development Environment.
Host Name Ip address Installed software
Kubernetes01 192.168.0.71 Docker() - njoonk
Kubernetes() - njoonk
Kubernetes02 192.168.0.72 Docker() - njoonk
Kubernetes(POD) - njoonk
Kubernetes03 192.168.0.73 Docker() - njoonk
Kubernetes(POD) - njoonk

■ Hadoop Development Environment.
Host Name Ip address Installed software
hadoop301 192.168.0.51 hadoop(master name node)
hadoop302 192.168.0.52 hadoop(secondary name node)
hadoop303 192.168.0.53 hadoop(data node1)
hadoop304 192.168.0.54 hadoop(data node2)
hadoop305 192.168.0.55 hadoop(data node3)

Wednesday, December 2, 2020

Linux - Initial setting after Linux install

■ Register a user on the following file.
njoonk  ALL=(ALL)  ALL
$ cat /etc/sudoers
njoonk ALL=(ALL) ALL

@ Disallowing Root Access
■ Edit the following file, set the PeritRootLogin parameter to no
PermitRootLogin no
$ vim /etc/ssh/sshd_config
PermitRootLogin no
sshd should be restared on CentOs8.2
$ systemctl restart sshd
$ systemctl status sshd

■ Change a host name
@ Before
[root@localhost home]# cat /etc/sysconfig/network
NETWORKING=yes
HOSTNAME=localhost.localdomain
@ After
[root@localhost home]# cat /etc/sysconfig/network
NETWORKING=yes
HOSTNAME=centos04
GATEWAY=192.168.11.1
Check hostname information
[root@localhost home]# hostnamectl
■ Edit hosts file
@ Before
[root@localhost home]# cat /etc/hosts
127.0.0.1 localhost localhost.localdomain localhost4 localhost4.localdomain4
::1 localhost localhost.localdomain localhost6 localhost6.localdomain6
@ After
[root@localhost home]# cat /etc/hosts
127.0.0.1 localhost localhost.localdomain localhost4 localhost4.localdomain4
::1 localhost localhost.localdomain localhost6 localhost6.localdomain6
127.0.0.1 centos04
192.168.11.23 centos04 localhost
■ Just restart the network
$ /etc/init.d/network restart

@ Set DNS
@ Before
[root@centos04 sysconfig]# cat /etc/resolv.conf
search centos04
@ After
[root@centos04 sysconfig]# cat /etc/resolv.conf
search centos04
nameserver 192.168.11.1

Tuesday, December 1, 2020

Linux - Changing a DHCP for STATIC IP on CentOs8.2

■ Changing a DHCP for STATIC IP.

1, Add the static IP information as below


2, Edit or add nameserver 192.168.0.1 into /etc/resolv.conf

3, Restart network (Don't execute the following command on remote)
    $ sudo nmcli networking off
    $ sudo nmcli networking on

OR
    $ sudo systemctl restart NetworkManager.service

4, Check the logs
    $ sudo journalctl -fu NetworkManager

To resolve the conflicting or being different Mac address

 ■ You might meet the following error when importing an images on VirtualBox.

 ■ How to solve the troubleshooting on CentOs

1, Check the net


2, Edit /etc/udev/rules.d/70-persistent-net.rules
    $ vim /etc/udev/rules.d/70-persistent-net.rules

3, Check to work as a restarting the network.


■ How to install net-tools (ifconfig, etc) on CentOs 8.2

$ sudo yum -y install net-tools


Monday, November 30, 2020

MYSQL - How to install MYSQL8 on Ubuntu

■ How to install MYSQL8 on Ubuntu

1, Download repository package of MYSQL.

2, Install the Repository package of MYSQL.
    $ sudo dpkg -i mysql-apt-config_0.8.16-1_all.deb

3, Select Mysql Server & Cluster (Currently selected: mysql-8.0)

4, Select Mysql-8.0

5, Update the information of the package and install mysql8
    $ sudo apt install mysql-server


Tuesday, November 24, 2020

■ There is the following error when loading a image exported in Windows 10.

■ You should do the following process to solve the problem.

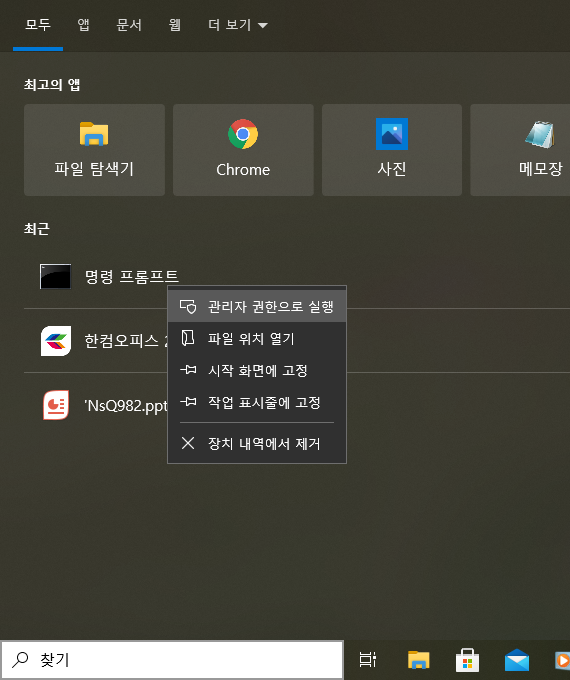
1, Open command prompt as Administrator.


2, Run bcdedit to check hypervisor status:

3, hypervisorlaunchtype should be disabled.
    $ bcdedit /set hypervisorlaunchtype off